Friday, August 5, 2011

Friday Favorites #1

 Love my Coastie -- shanynmarie

 Man/Woman Glass Set - phoenixfirestudios

 Florally Studs -- LaPetiteBoheme

 Circus Woodland Owl Wing Clip -- sleepyking

 Bonny Naranja Sunglasses -- MODvintageshop

 Hammered Copper Stacking Ring Set -- MixedMetals

Mike and I will be getting married in three days now!  These finds are inspired by that special day.  We are not having a ceremony, just going down to the courthouse to make things official.  I don't think I am any less excited than any other bride, this is just honestly more our style.  These finds either remind me of Mike (my favorite Coastie, of course!) or is something I wish I had found sooner to wear on the big day! (pretty excited to keep things casual) Which of these are your favorites?

While I wait for Monday I will be enjoying the weekend alone.  Mike is at work all three days so I will be using my time to get a few blog posts hammered out and start finding things to do for our honeymoon!  We haven't decided on Milwaukee or Chicago yet, I just can't make up my mind (though I'm leaning towards Chicago).  I really want to go to the zoo and aquarium and of course eat some deep dish pizza.  If you have any suggestions on either city let me know!

I hope you all have a great weekend -- and excuse my giddiness over the next few days (or weeks....)!!

Thursday, August 4, 2011

A Mini Surprise


Yep!  Mike and I went and applied for our marriage license yesterday.  It was super exciting and a little nerve-wracking at the same time.  Even though we aren't having a ceremony I am still getting nervous about the big day (four days from now!!).  For some reason this part had me the most nervous, I don't know why!  Maybe a fear of suddenly not being able to find our birth certificates or sudden inability to remember my father's middle name.  Nerves!  Ack!  But it's done and over with and now we just have to go pick it up Monday morning before heading to the courthouse. (Cue big cheesy grin)


I also finally decided to try out the tutorial I read about awhile ago on The Dainty Squid.  It was super easy and fun and I love the way it turned out, even on my little stub nails.  All I needed was some scotch tape and a little patience. Can't wait to try it again with a different color combination.  What do you think?  If you haven't done something like this before you should definitely go over to Kaylah's blog and check it out. She has amazing instructions and great pictures.

Wednesday, August 3, 2011

How to Make Butter

Lately I have been on a "Make My Own Stuff!" kick... more so than usual.  While watching Food Network one night (Chopped fans here?) and seeing a chef make his own whipped cream I realized... I've never done that.  To the internet I immediately ran and after doing some reading and research I decided to make.... butter.  It just sounded more fun than whipped cream and much more practical! ;)

Handmade Delicious Butter
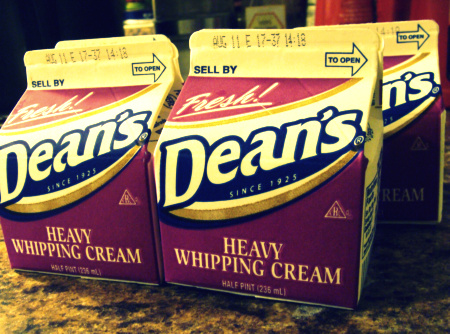
What you will need: Heavy whipping cream, blender/food processor/mixer/mason jar

I bought four half pints of heavy whipping cream. This made me about 12 ounces of butter. 

 Pour it into the mixer!  You're going to want to mix it on medium to medium high speed.  It'll splatter a bit!

 Lookie!  It's starting to do.... something!  It's getting all fluffy and bubbly..... exciting.

 Whipped cream! The real stuff!  Of course I had to dip my spoon in and try it (with a dash of suger) and lemme tell you... I almost stopped right there and ate it straight out of the bowl. Who needs butter anyway??? 

 YUM!

 Okay, focus Cas.  Let it whip some more and it will start to separate and turn yellow.  It will also start to splatter.  This is the buttermilk separating!

 Once it is fully separated you are finished.  Just stick your hands in there and scoop up all of the butter and give it a nice big squeeze.  I rolled it in some paper towels to squeeze out as much liquid as possible. Give it a nice rinse in some cold water as well to get all the buttermilk out. Pancakes anyone?  Just strain it and the buttermilk is definitely usable!

Look at me!  I'm a butterball!

After pressing my butter into a small tupperware container I mixed in a little bit of salt.  This is of course optional, it's totally your preference.  Now, this method isn't really cheaper than buying butter at the store. Each half pint cost me $1.09 and like I said I got less than a pound of butter.  But... I really like the idea of knowing exactly what is in it and hey... it was a blast to make!

P.S. - Wonder about the mason jar in the "What you will need"?  I almost forgot... when I was in middle school we made butter at summer camp!  Just pour the heavy cream in to a jar and SHAKE SHAKE SHAKE until you can't shake anymore.  It's the same concept.... but a bit more labor intensive.

Have you ever made your own butter before? Let me know if you try this!  It is so delicious... you definitely won't regret it.
Related Posts Plugin for WordPress, Blogger...